
30 Days with my CNC
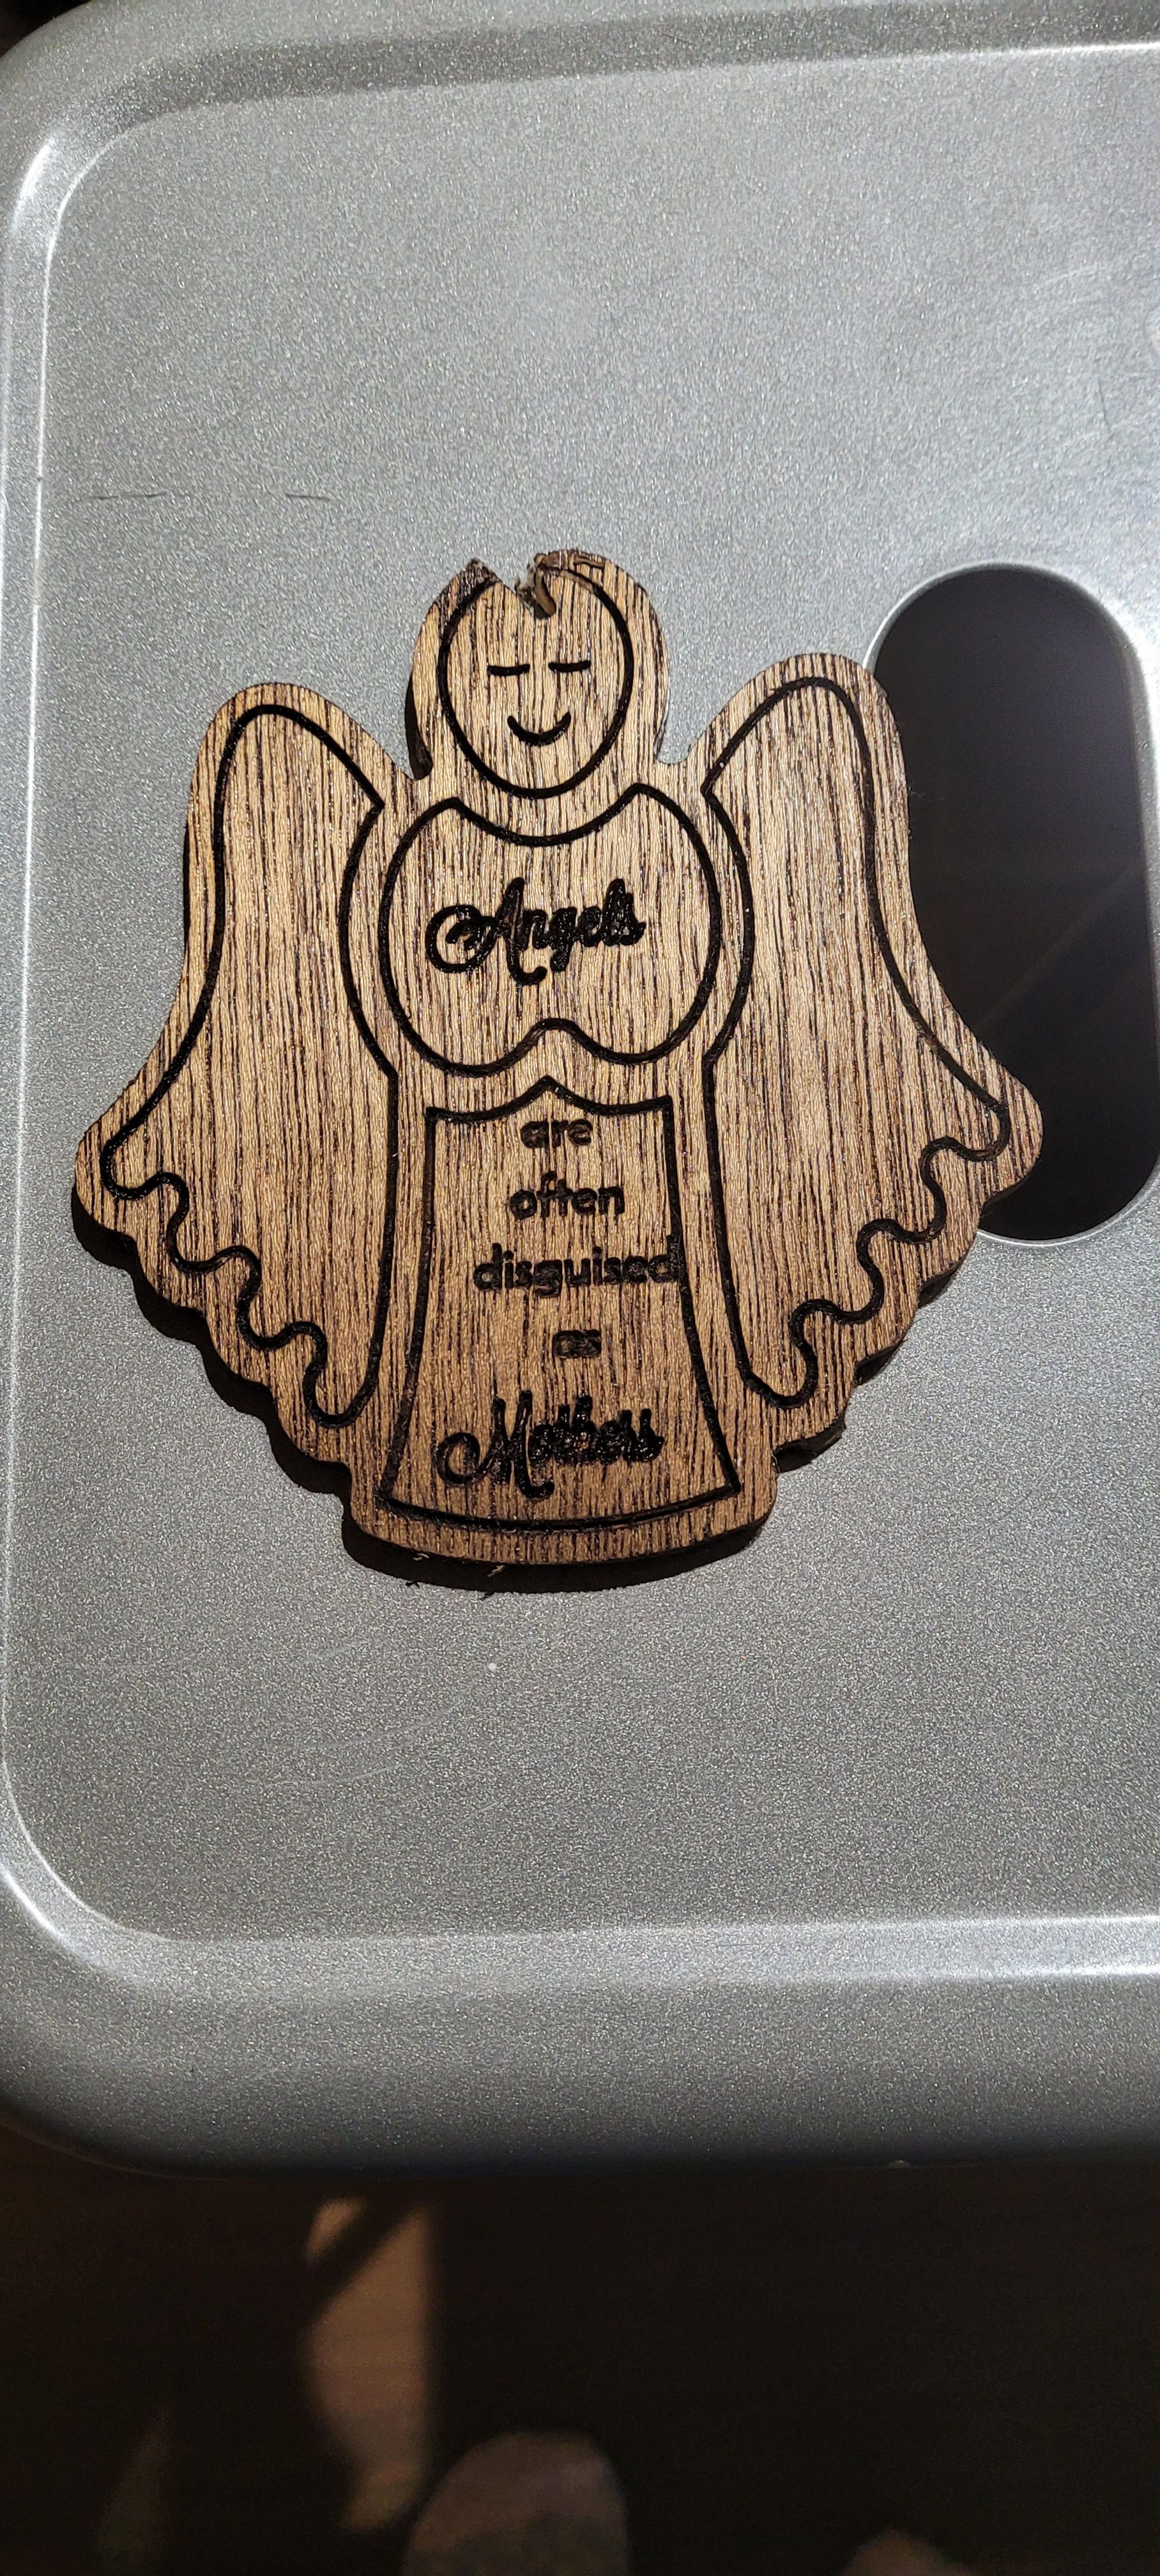
Things seemed to be moving right along, when suddenly, the poor spindle made a tortured belch, jerked a downward gash in that innocent angel's head, and came to a complete stop.

Beware! Warning! Danger! Do not, I repeat, DO NOT click on those videos that show up on your Facebook newsfeed, cleverly selected by covert Facebook algorithms, letting you know what you want even before you know you want it. I was casually browsing my page one day, sitting in my chair, minding my own business, when an innocuous little video slid into view. A cute young lady was smiling happily over her worktable in what appeared to be her woodworking workshop. Of course it was, my FB algorithms have long since tuned in to my woodworking crush. She was branding her woodwork with a laser, burning her logo on the piece as a final, professional looking touch. It was so beautiful! Her logo on that smooth, glossy piece of walnut, it simply begged to be reached out to and touched. (Sleek, silky horses have this same effect on me, but that's another hobby, another story.) Redirected to the YouTube site, she made it look so easy. Smiling all the while, she selected her ready-made file (software, not metal tool), popped it in the machine, pressed a button, and presto, there was her logo, perfectly placed and burned to the correct depth with crisp, clean lines.
Loving the look of laser-etched art, I longed to do this. Of course, there were links to the product web site, and the price wasn't too prohibitive. But I'm going to live with this thought for a while and take some time to think about it. Christmas was well on its way, and I was too busy to take action right now anyway, and tax time would be right on its heels after that, so there was no hurry to do anything. I bookmarked the site and arose from the seat of temptation, turning away from the hand-held device that delivered it.

A few days later, during a text conversation with my otherson, Jason, I mentioned that I had seen this and sometimes thought I'd like to have a thing like this. Jason was a young man who started out as a Navy friend of my son, but over time we developed our own friendship/Momship. Having no other plans, he was coming for Christmas from California, where he works as a robotics engineer for Google.
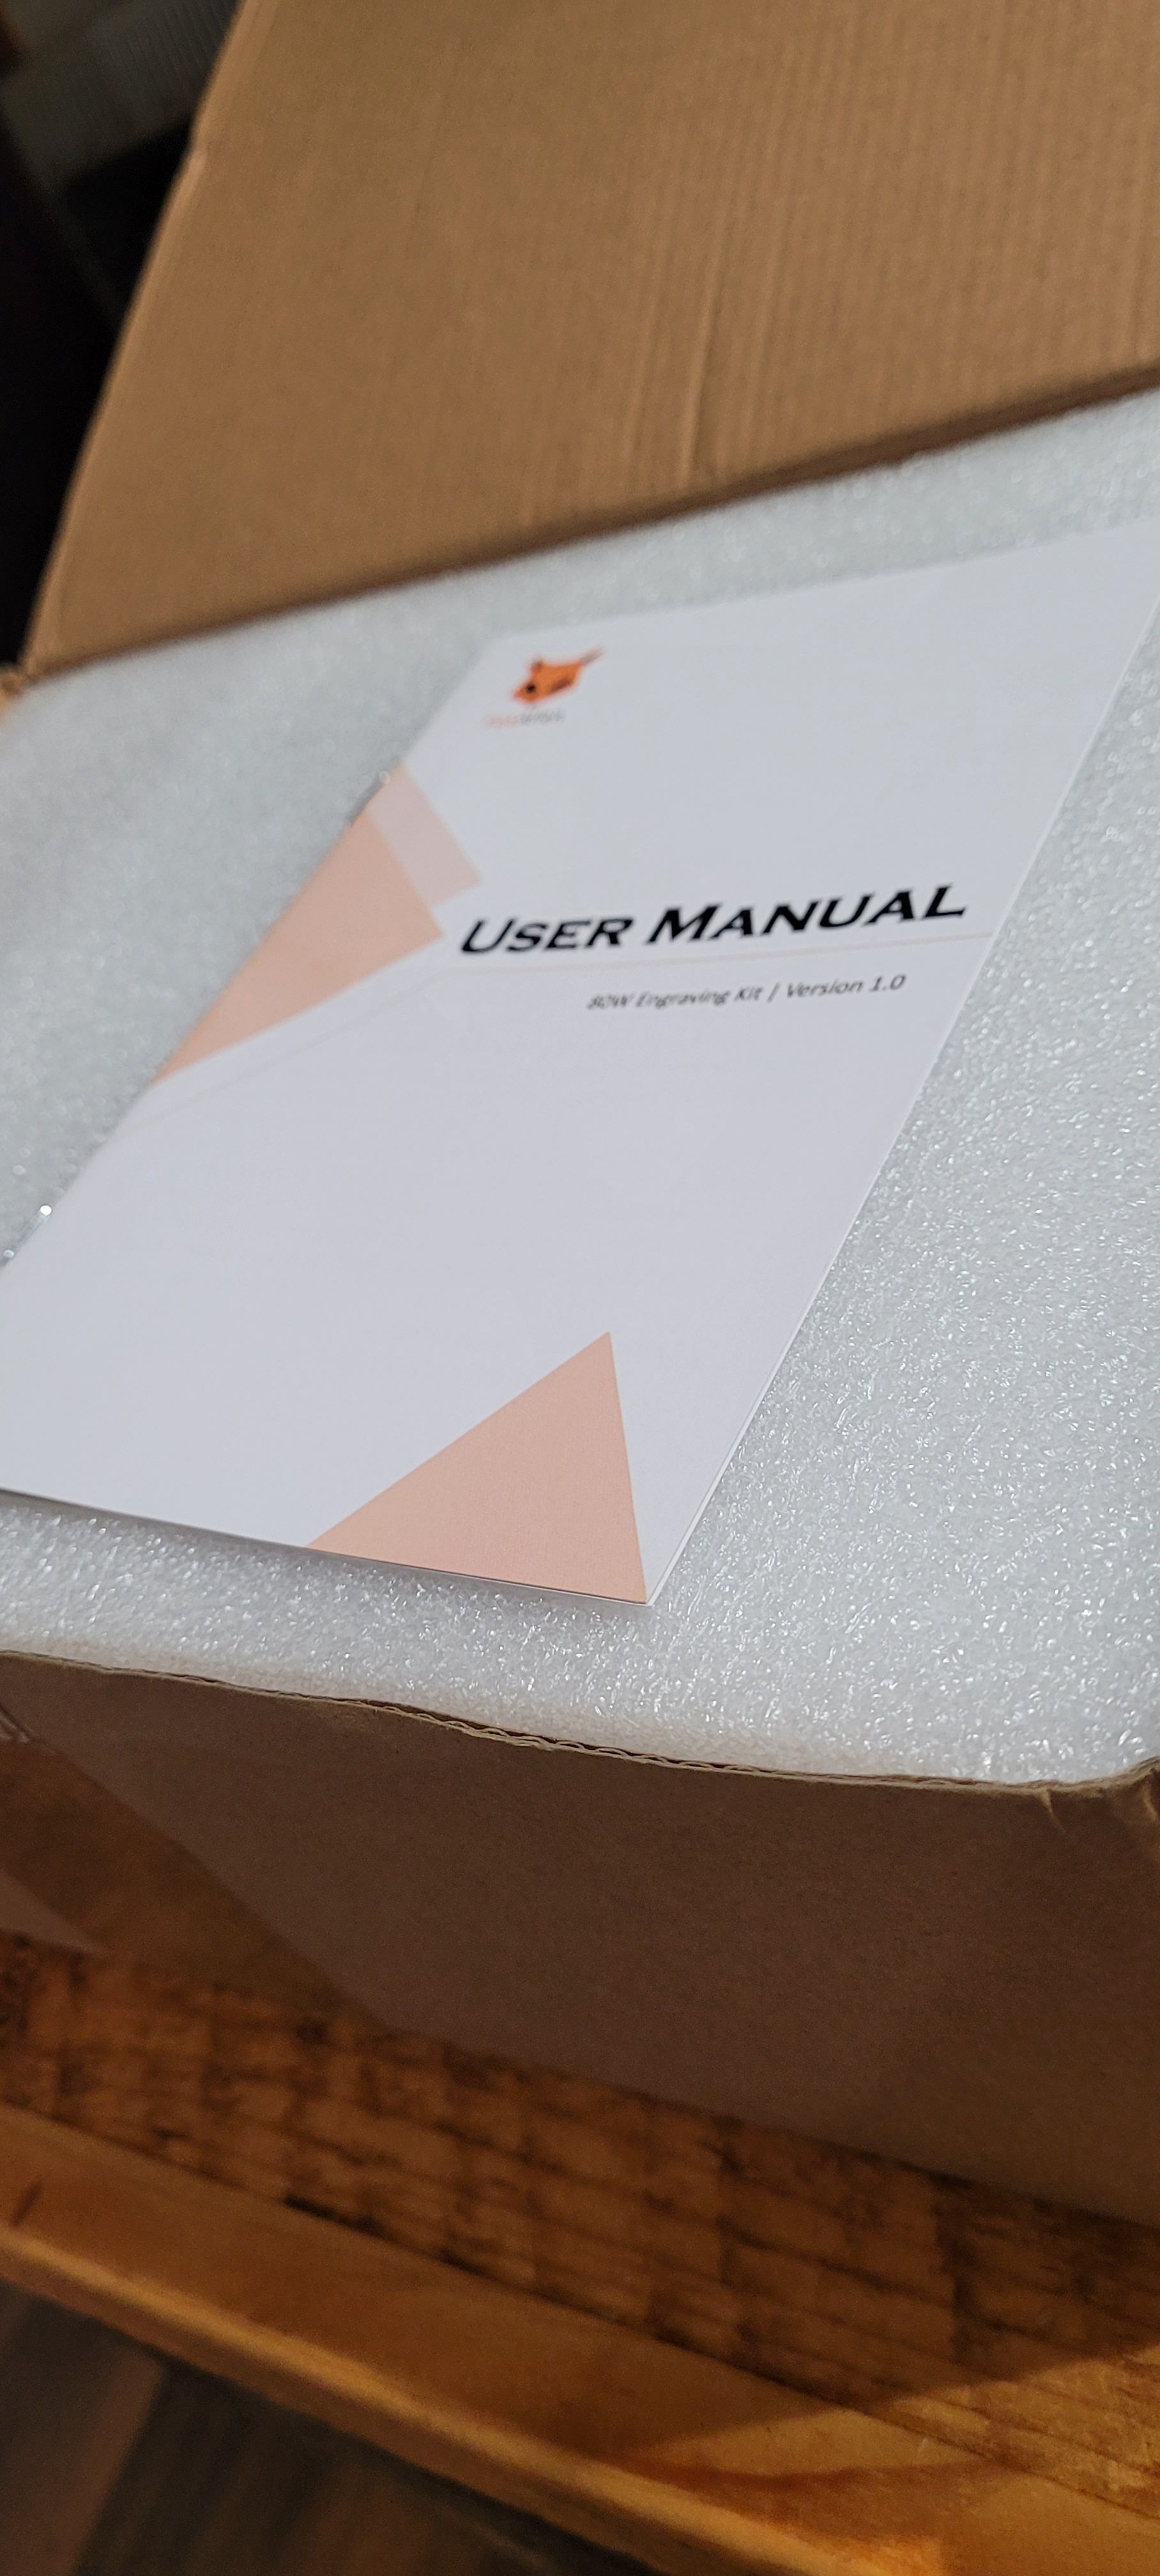
"You want a cnc machine? I'll get you one for Christmas," he said. I objected, telling him that way exceeded the gift price limit, but he ignored me and texted a few days later that he had ordered the 4040XE from FoxAlien. Way exceeded the price limit. Even the plug and play, dummy-proof Sculpfun that I had seen in the video was out of gift range, this would cover gifting to infinity and beyond. I swallowed hard and said thank you. He also sent a list of things I would need to acquire. Digital calipers? I wasn't designing O-rings for the space shuttle; did I need to measure tolerances of fractions of millimeters? Is there even such a thing as fractions of millimeters? But I dutifully ordered them, and I'm quickly beginning to see how useful they are. He told me I would have to get the laser module for myself for Christmas. OK, I can do that. I really wasn't sure what that even was but I got on the FoxAlien website and ordered something expensive. Who knew there was a difference between lasering and cnc cutting? At this point, not me, but I was learning.
The 80 lb. box was delivered and sat in my entry way until the day after Christmas, when Jason had arrived, and we had time to unbox it. We assembled it on the kitchen counter. We were in the middle of a record cold snap and there was no way I was going to the shop. Within 30 minutes, he had it put together. I was finally able to help by plugging in the Z, X and Y cables, all dummy proof with clearly marked cable-to-port tags. Hitting the on switch, it dutifully moved the spindle to the lower left corner. Throwing the mdf practice piece on the base, he explained to me about zeroing your start point. Or he tried to.
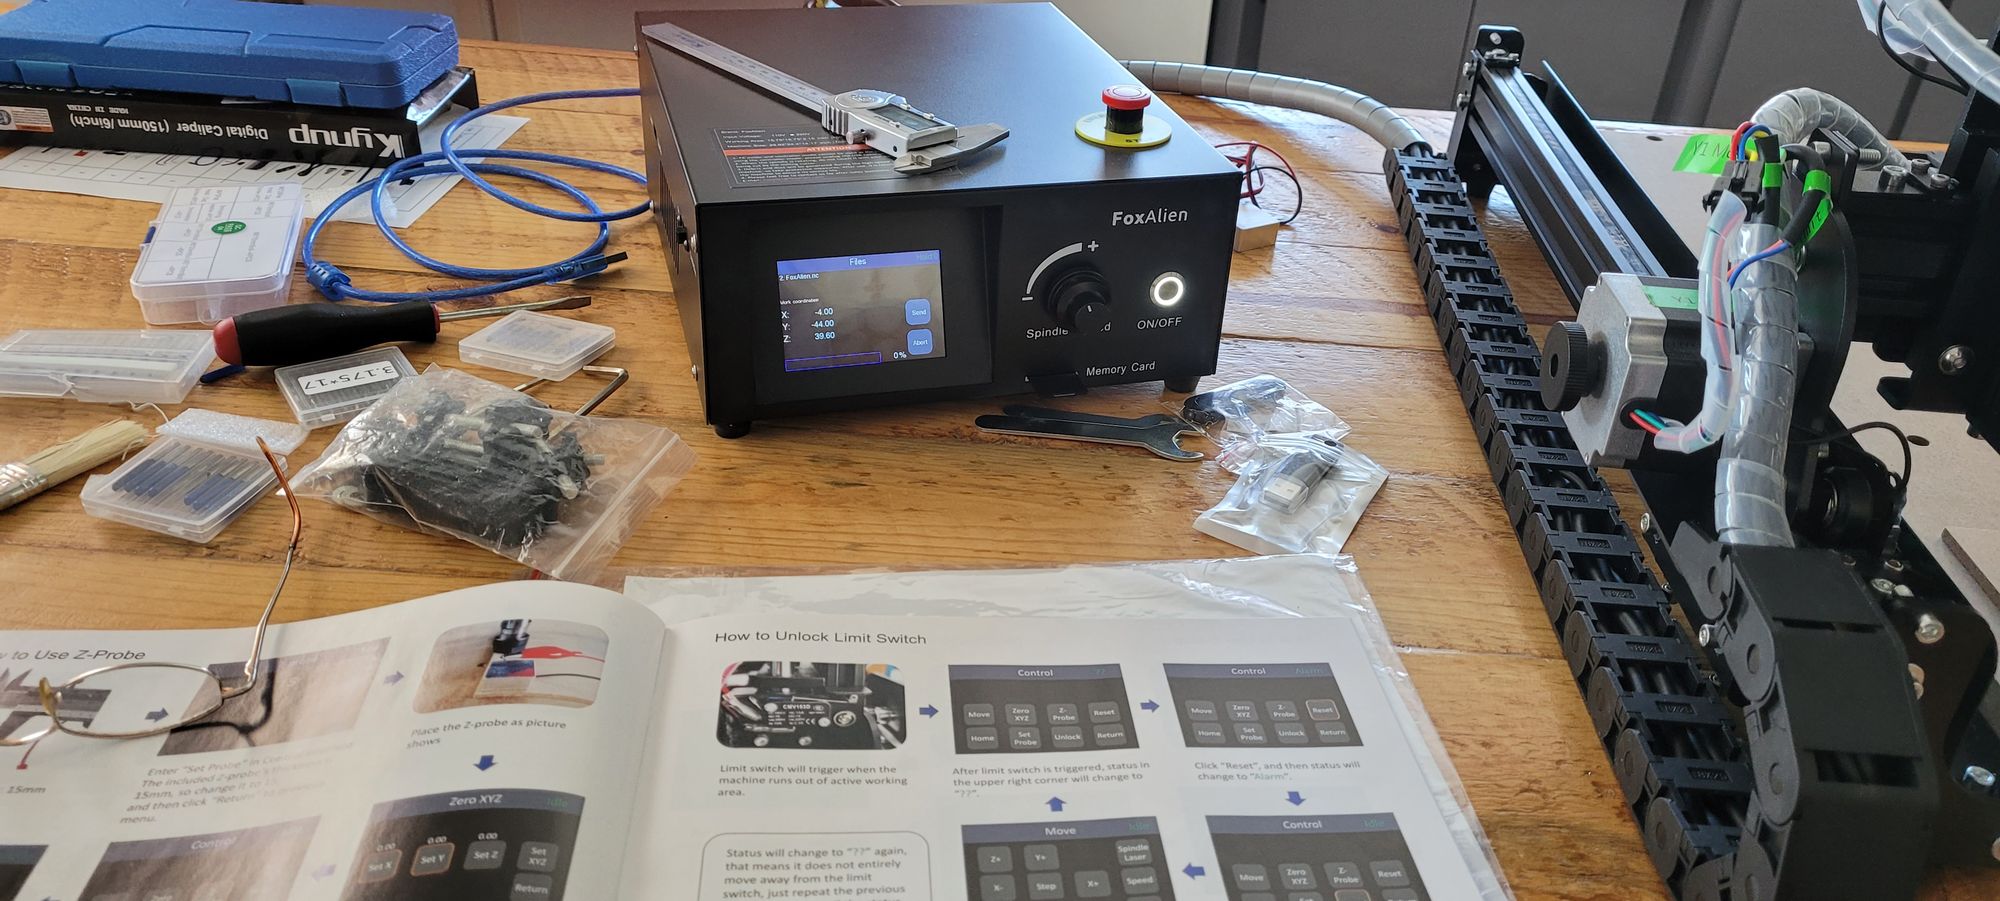
"OK, use the controller to move to your starting point. Y+, Y-, X+, X-, Z+, Z-. Up and down the board, across the board, and the spindle up and down. Y left. No, Y right! X! X minus! Wrong way. Try Z! Z+, raise the spindle. Now nothing is moving? "You hit the limit switch. You have to unlock it and reset." Apparently, if you go too far, it locks something instead of just refusing to move. That would happen quite often. I soon learned to look at the upper right corner to see what the controller status was. Idle was a good-to-go point. Alarm meant you weren't goin' nowhere. And sometimes it showed ??? What the heck? If it was asking questions, we're both in trouble, because I sure didn't have the answers. Fortunately, it had a nice big owner's manual with pictures and arrows showing each step. I finally got it to the point where send would actually start the process, but we stopped short of making an actual cut in the house. Jason also showed me the emergency stop button, located prominently within handy reach on top of the controller box. "This is your best friend," he said. I have, indeed, discovered that it is an imminently useful function.
I can't forget the Step button either. When moving the X, Y, or Z axis (see how I've learned to use that word?) you can choose the distance at which it moves. 10 is a goodly amount, giving you plenty of room to trigger the stop limits, while .01 appears not to move at all. That is another tiny little fraction of a millimeter. If you forget to change steps when you're getting close to your start point, you will either trigger the limit switches or jam your bit into the bed.
The next day was still cold, and Jason was sick. I left him alone until afternoon, assuming that jet lag, late nights, and time zone differences meant that he was just sleeping. By the time 2 pm rolled around, I was having visions of the police asking why I hadn't thought to check on him sooner, and when I did check on him, the noise I had thought was snoring was instead, fever dreams and moaning. Some Mom-person I am. He finally made it to the couch where he continued to sleep off and on, after eating a grilled cheese sandwich and drinking Gatorade.
The cold weather didn't break before Jason left, and the machine sat on my counter until my son came over and moved it to the shop for me. I was on my own.

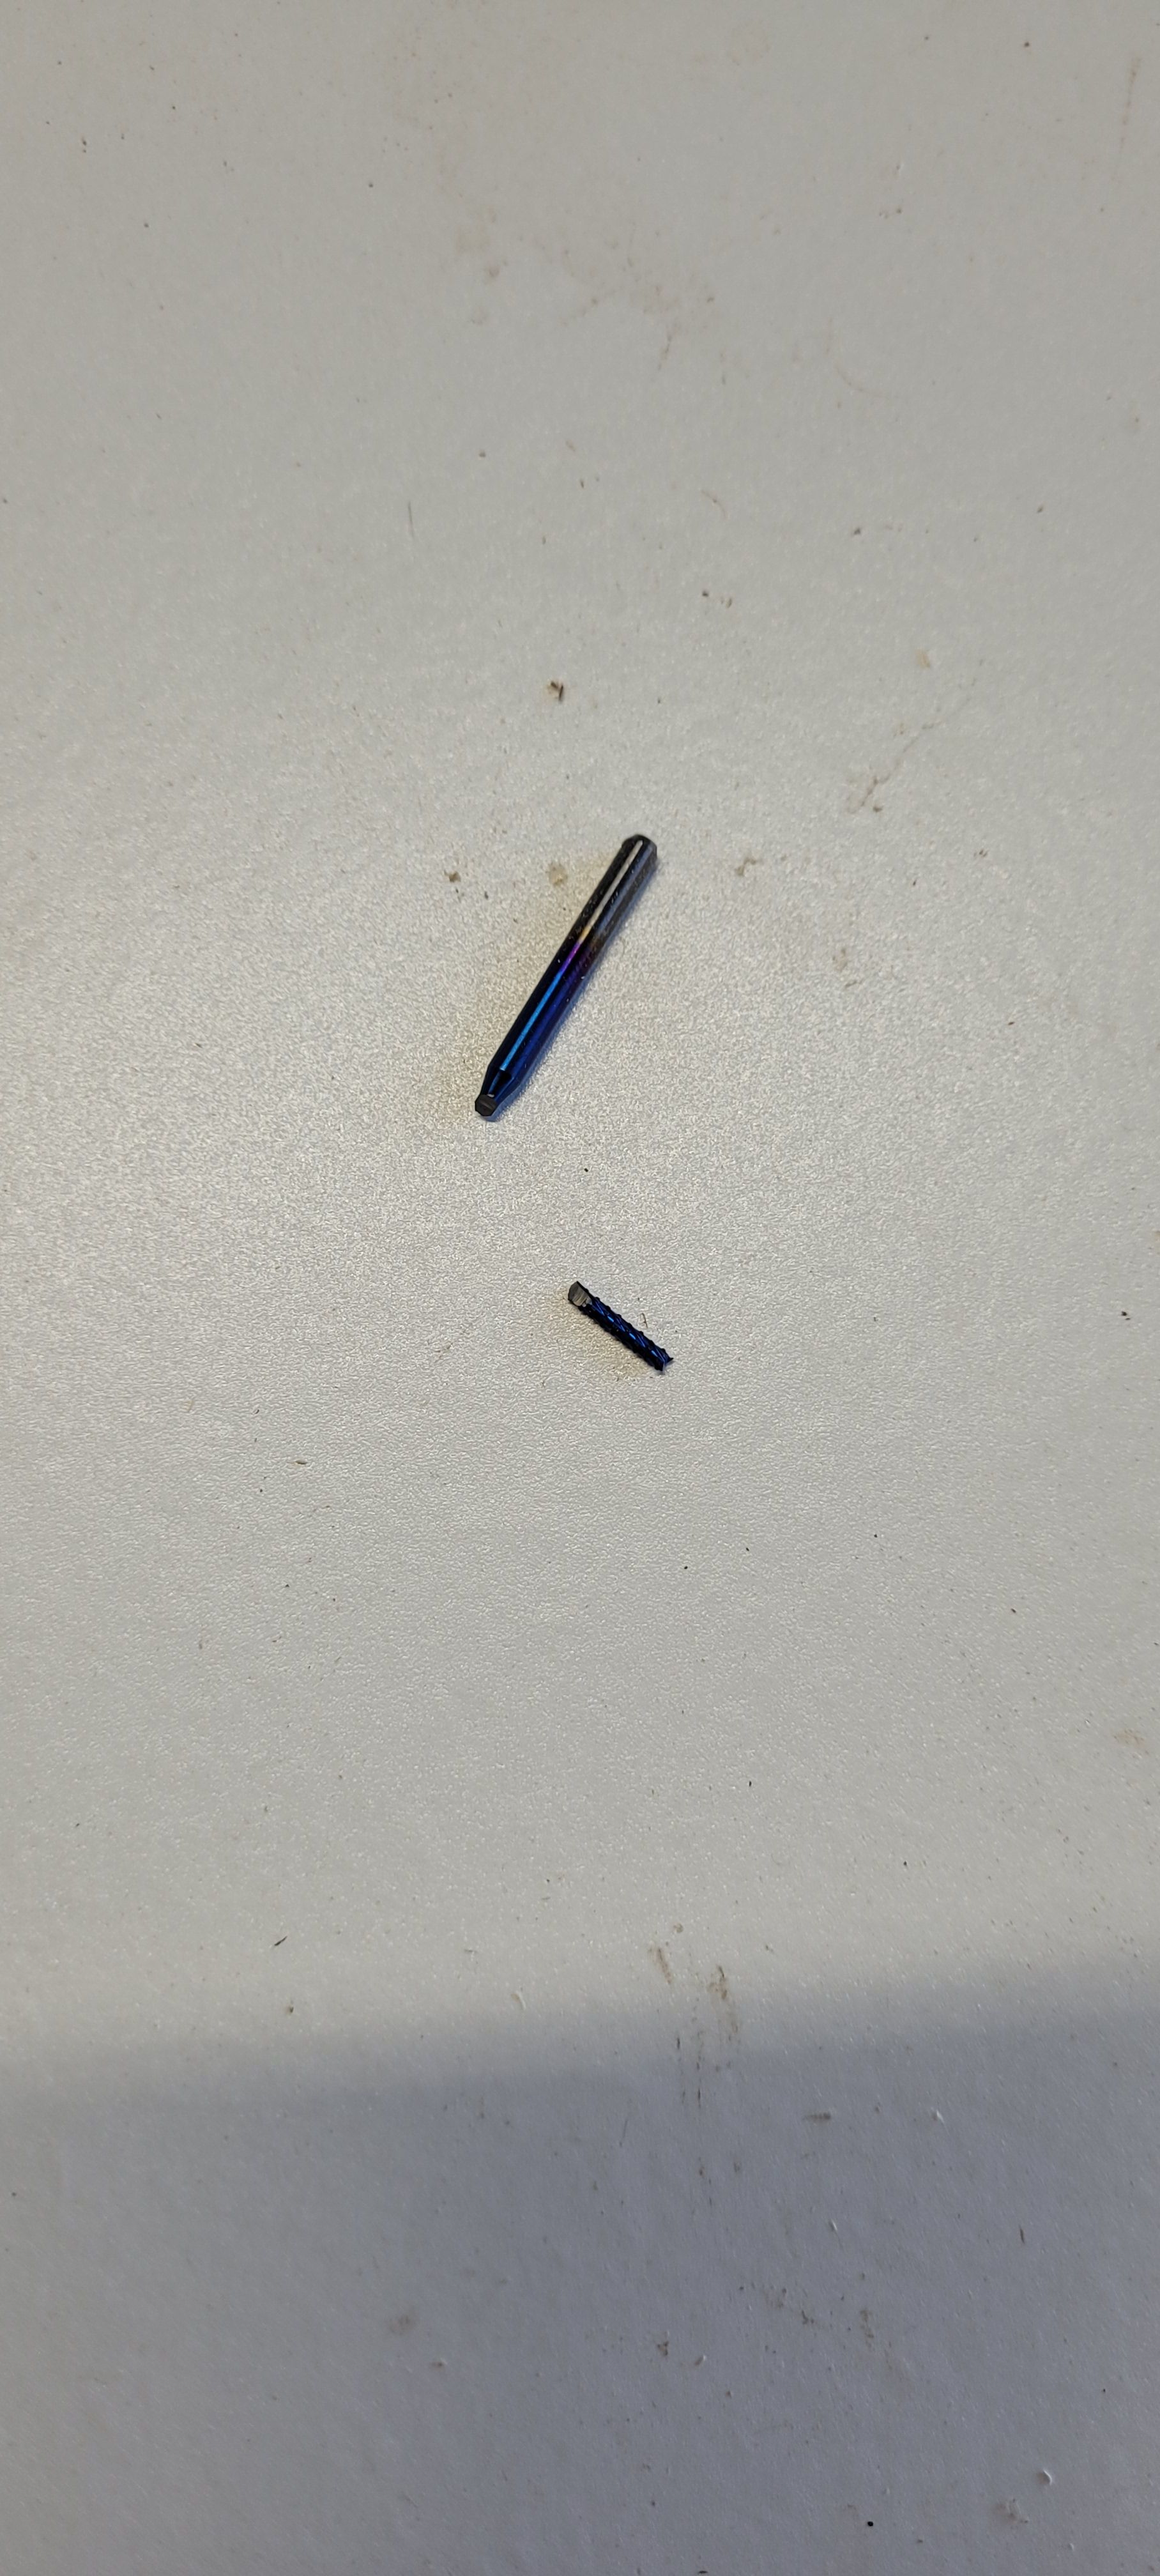
So there it sits, belligerently waiting for me to approach it. I give it a wide berth while working on other things in the shop, watching it carefully from the corner of my eye. Tracked and looking like a quasi-military insect perched on my workbench, we sized each other up. I have YouTube in my corner, beast, I warned it. It didn't care. Its patience was endless, eternal. Its blank eye stared at me from the controller. Finally, fortified with hours of video, I chose a warm afternoon to make my move. I had spent several evenings identifying the bits that had been included with the router and the extra ones I had purchased. Not knowing there was a difference in some of them, I had placed them randomly back in their tiny boxes. But figuring out that what FA called a pyramid bit was the same as a v-bit, sort of but not really, I now see that in the box of 10, there are 5 different angles. Not that I know yet why there are different angles, I proceed to compare each of the ten and place them in ascending order in their plastic case. What are these odd little things that appear to be 10 of the same? FA tells me they are corn bits, included with the package. A corn bit? I haven't even seen that mentioned among upcuts and downcuts, flat-ends and end-mills, ball-nose, 1-flute, 2-flute, 3-flutes more. Even Google hid any mention of them several pages down, dismissing them as sort of the lowly workhorse of bits, neither up nor down, will make a ragged cut but use them if you must.
Armed with my selection of bits and the bit recommendation paper held before me as a shield, I sat down to make a cut. I will just use the practice piece and pre-loaded files to cut my teeth on. It has dawned on me that you have to write your own files for the design you want. Paw Paw's Workshop has some videos geared toward newbies such as myself, and he's using Easel, so Easel it is. But how to find it? Easel? Inventables? Easel is part of Inventables? That's the way it appears. In order to use the 30-day free trial of Easel, you get in through an Inventables account? But I don't need a Pro account, how do I get just a basic trial run? Well, you can't. You get Easel Pro free for 30 days, then after letting you use all the Premium functions, they will then bump you back to Easel non-Pro, knowing that you've become dependent on all the bells and whistles available in Pro, and will probably be coerced into paying the $14.99 a month for the Pro service. Clever. A drug dealer offering you the first hit free. When I finally get an account and can see inside the working parts of Easel, I'm hoping my familiarity with Canva and other graphic print apps will stand in my favor. Can't be too hard to add another dimension, can it? I spend several more evenings making some project files in Easel. Getting them to the memory card that goes to the controller is a bit of a procedure. Something called LaserGRBL keeps popping up. LaserGRBL is the 'sending' app, right? I ran across that term recently. It interfaces between my files and the router? But what's Candle? It also interfaces with the machine. Candle is the sender software that comes pre-loaded for Fox Alien? I'm confused. But I eventually see the files on the card, whether through LaserGRBL, Candle, or osmosis, I know not. But I thought the files were supposed to be g-code. The files that download are nc. So are the pre-loaded practice files on the card so I'm going to ignore that thought for the moment.
Back to my trial run. Prior woodworking experience has taught me that clamps are a woodworker's best friend, you can't do anything if your workpiece is not secure. So I snugged it down with the humpbacked little clamps, also included with the package. I power it up. Zero my axes, carefully following each little arrow step in the owner's manual. The files appear on the screen. I select FoxAlien. I hit send. Well, look at that. The spindle begins whirring, then rises obediently and moves to the workpiece. It lowers itself carefully into place and begins to move. But wait! The workpiece is moving too. Up and down is fine but across the grain is pulling it in the direction of travel. This I when I fully appreciate the emergency stop button. Abort mission. The spindle comes to a stop. I wipe the sweat from my brow and take a deep breath, willing my heart to stop fibrillating. Not an auspicious beginning. So this is why I saw the guys of YouTube using tape and Starbond adhesive and accelerator and more tape. I guess the hold-down clamps aren't enough. Now how do I get the bit out of the material? The limit switches are locked!
1-22-2023
Of course, I intended to document this experience daily, or at least more regular than this, but here we are. So many life things to juggle. Something has to suffer, I choose housework. I leave the vacuum sitting conspicuously in the room, so any random visitors will know that I have full intentions of using it. Before the day is over. Or maybe tomorrow. Soon, anyway. By now, I have completed a few projects on the tracked monster, with varying degrees of success. I have spent every evening watching videos and making some files. Since I have no Internet in the shop, I download the files to a memory card to be used in the 'offline controller'. That's a black box where I give the machine it's performance commands. Or in my case, I ask tentatively, following step by step in the manual and still sending the spindle to home position and starting over several times before feeling confident enough to hit send.
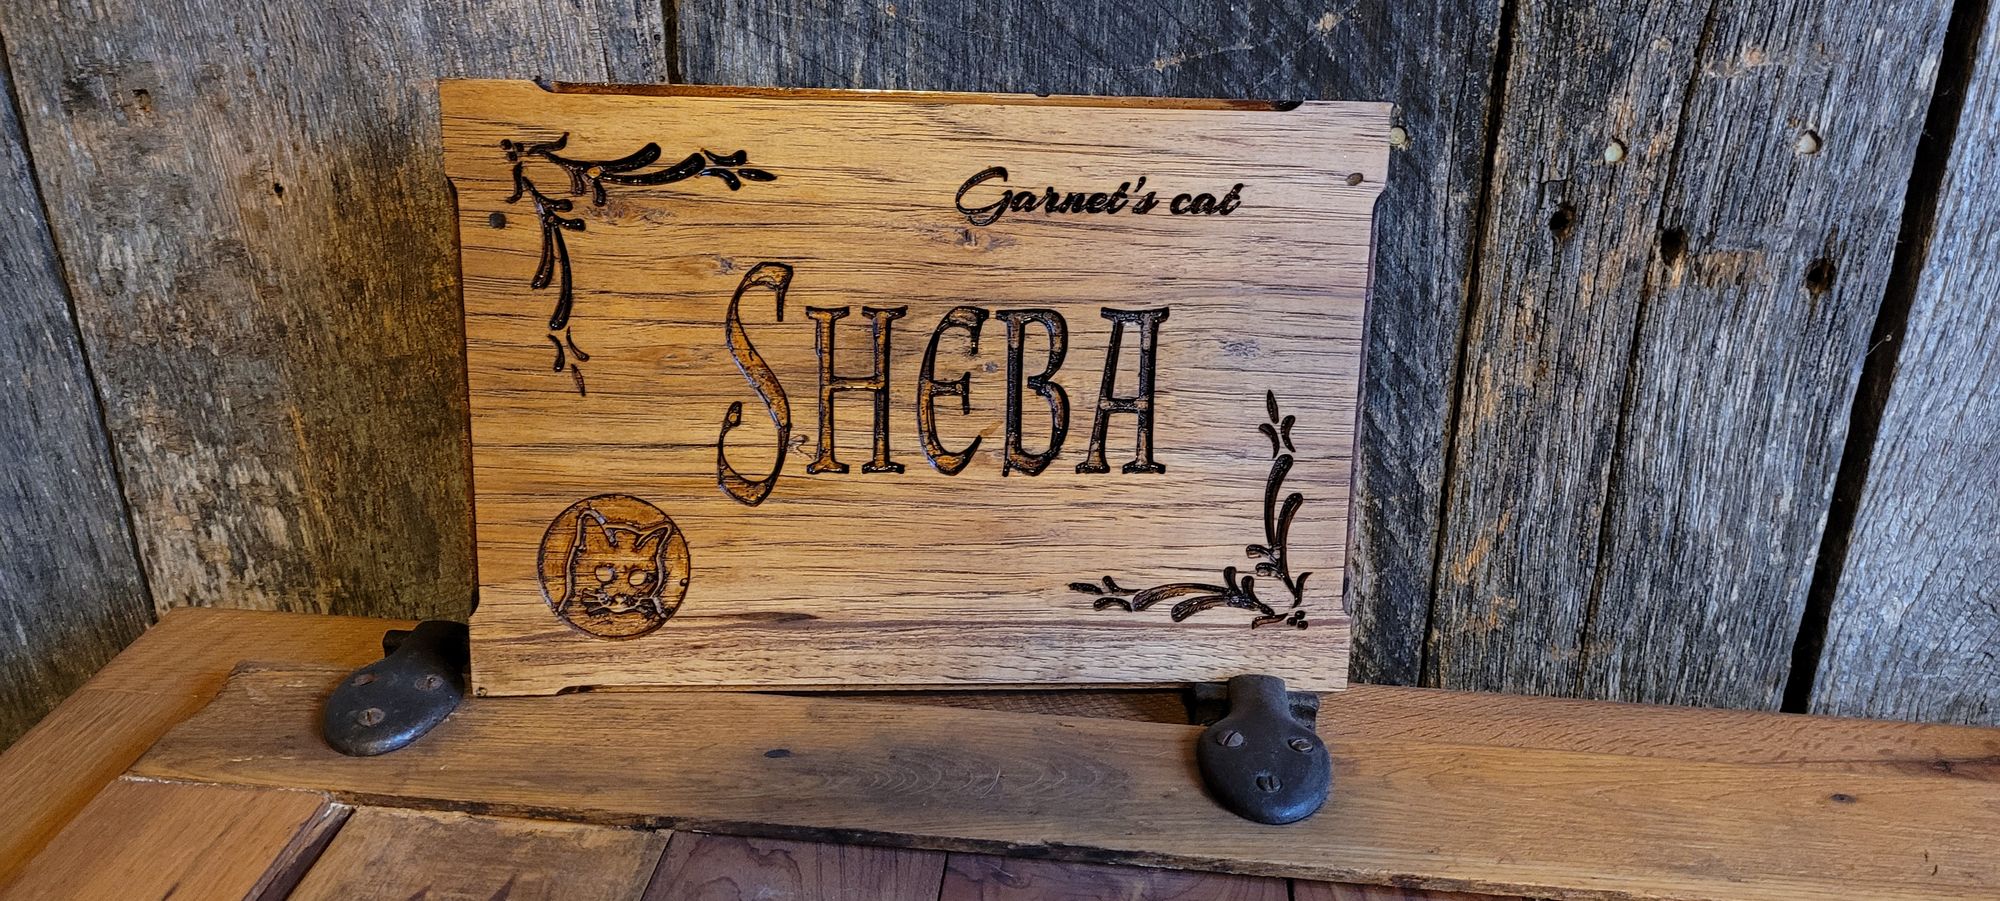
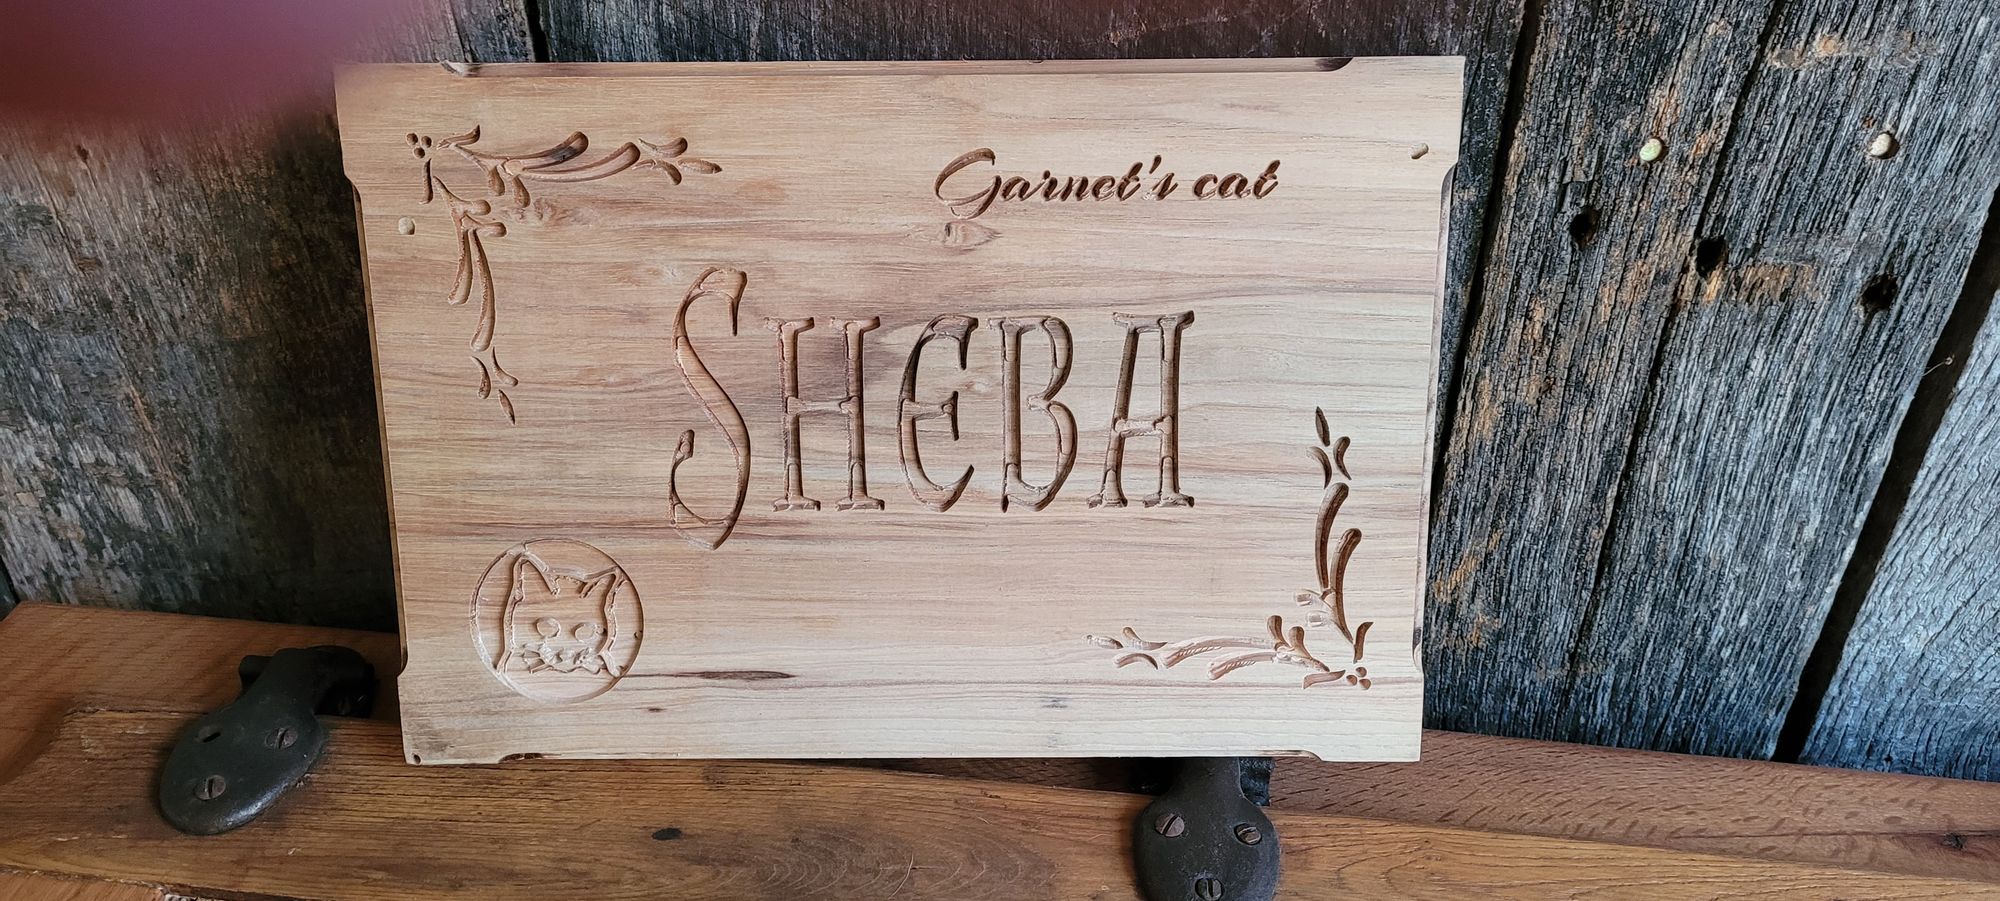
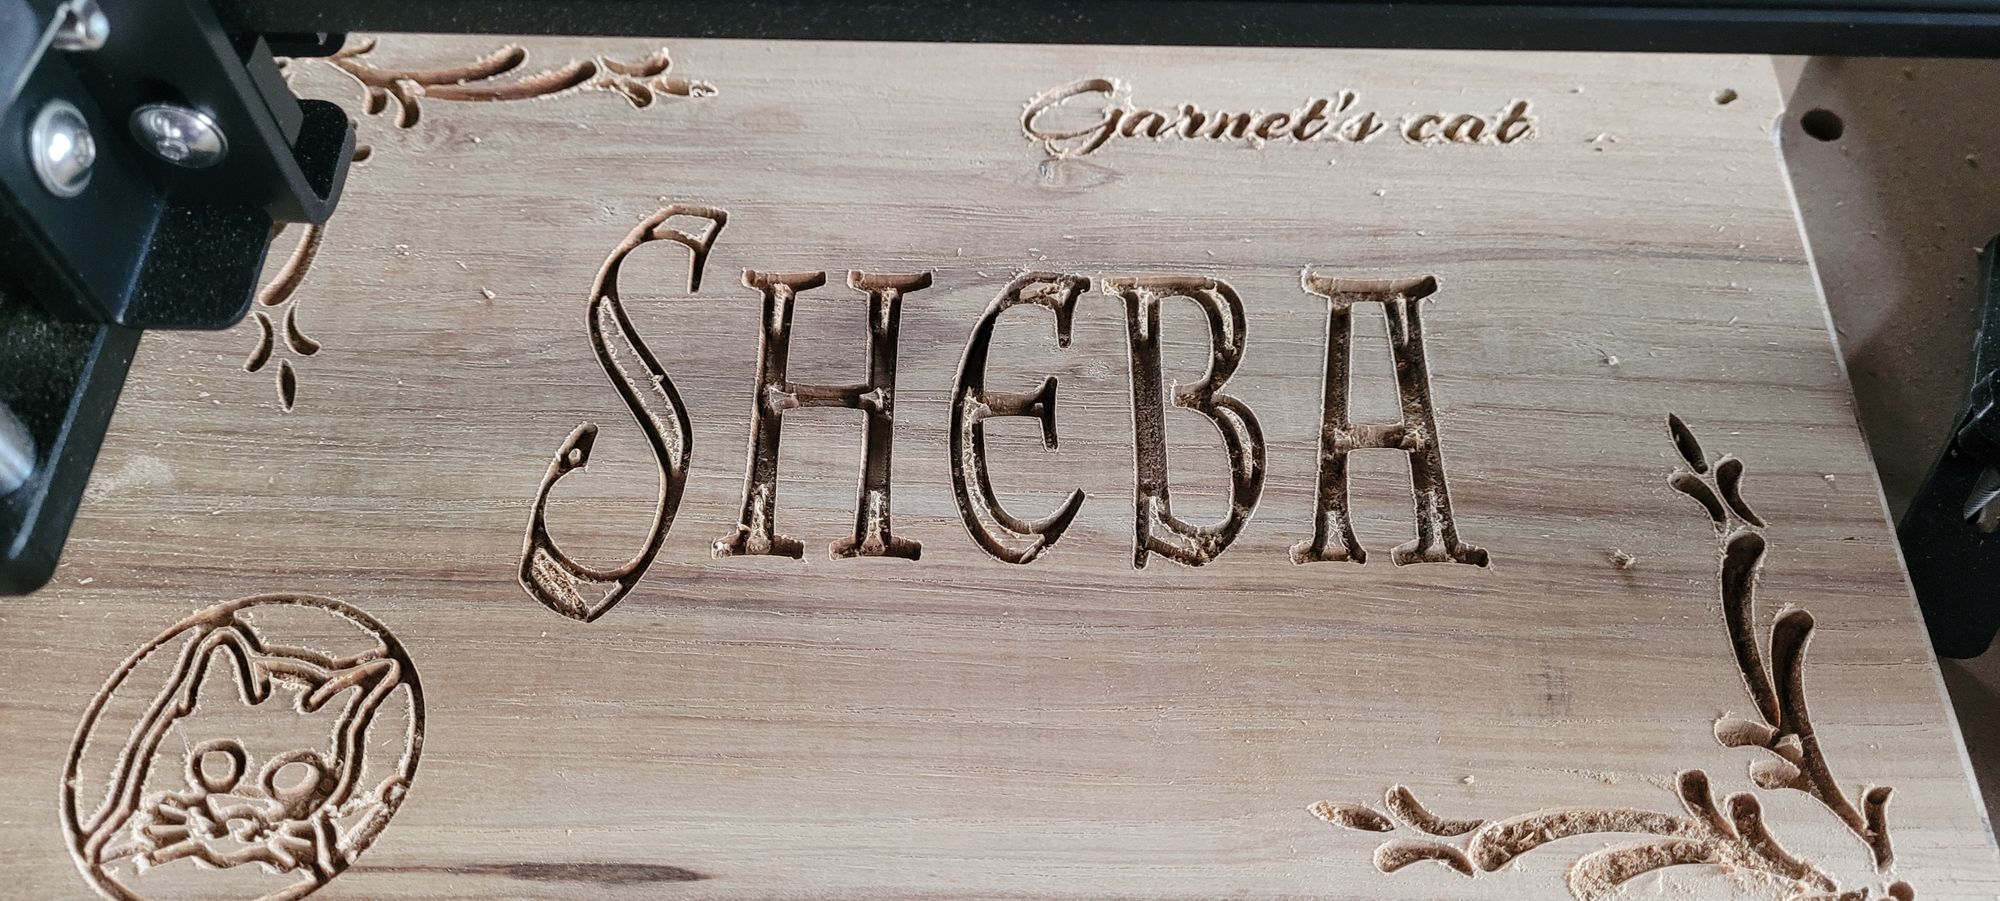
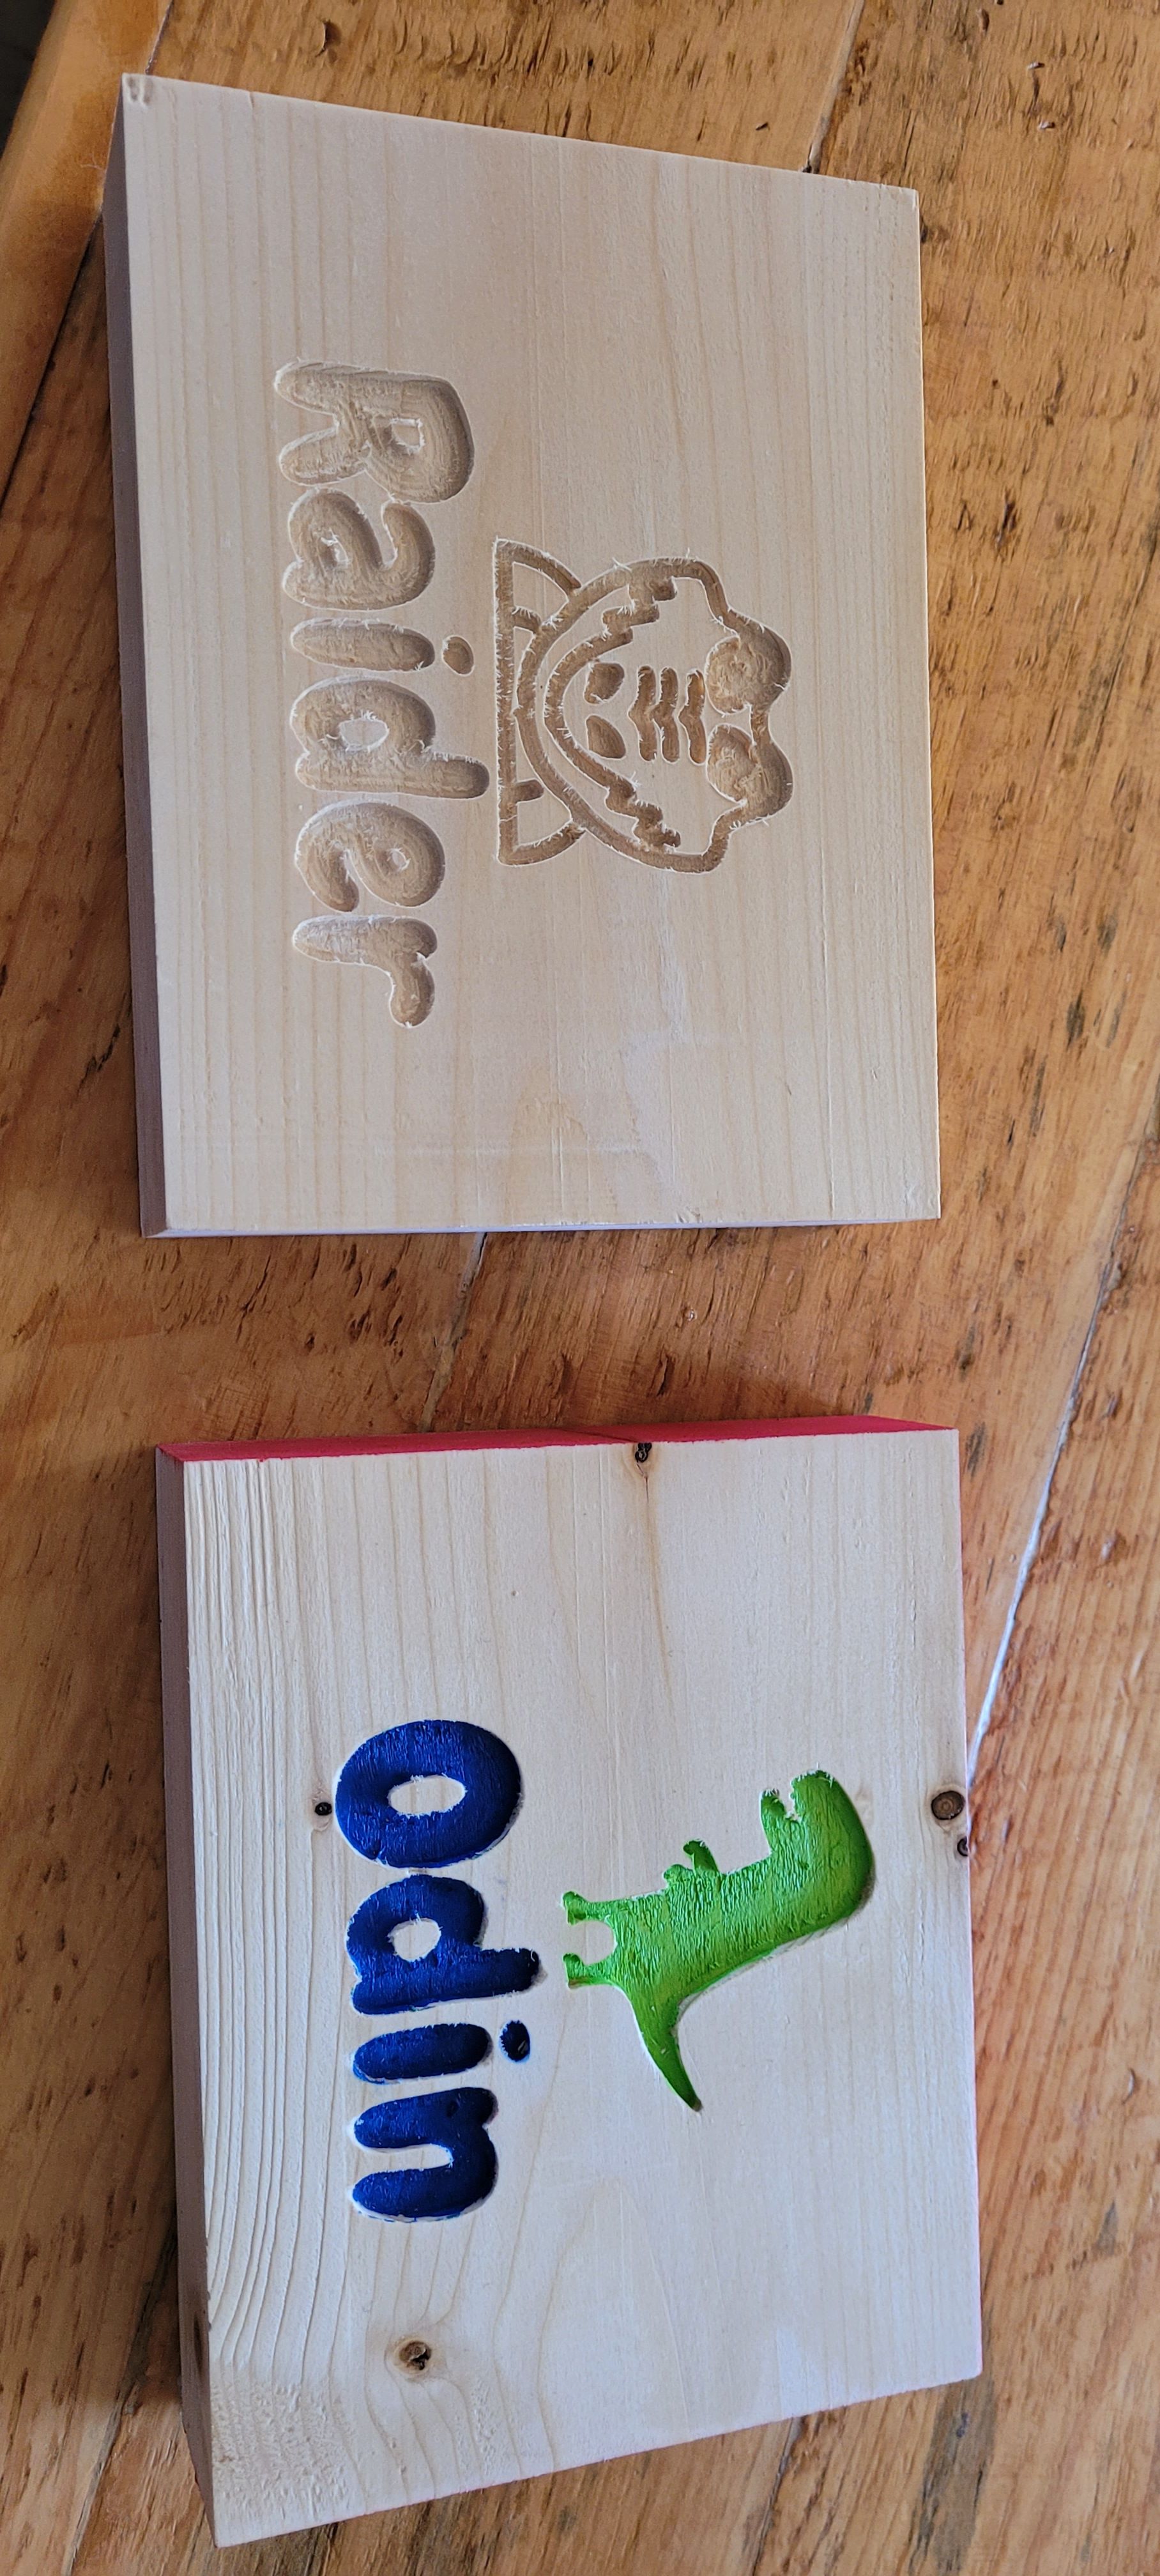
My first project was a plaque for my mom's cat. Mom died in 2020, and the cat in 2022. She loved that cat and the spoiled cat only loved Mom, but I'll make her a marker for her final resting place under the oak tree. The project looked pretty good on the Easel preview window. A couple of different fonts, some corner design elements, and even a cat profile in the lower left corner. I had a nice piece of oak about 8 x 12 all planed and ready. Roman Agee routered on the edge. I kept telling myself even though it was a pretty piece of wood, it was really just small scrap and if I had to throw it away, there was no loss. Or I can plane the errors away and try again. It was a fairly thick piece, good for several attempts. I fumbled my way with clamps and double-sided sticky tape, placing it on the temporary masking tape I've put on the machine bed, in place of an official spoilboard, which I've learned needs to be leveled, along with 'tramming' the spindle. Those things can wait, I want to get down to the real deal. Surely a couple of millimeters won't make any difference in the casual piece I'm doing. Besides, I barely know where the spindle is, much less how to 'tram' it. It seems to be making sure it is parallel to the spoilboard for perfectly level cuts. On the to-do list to learn for another day.
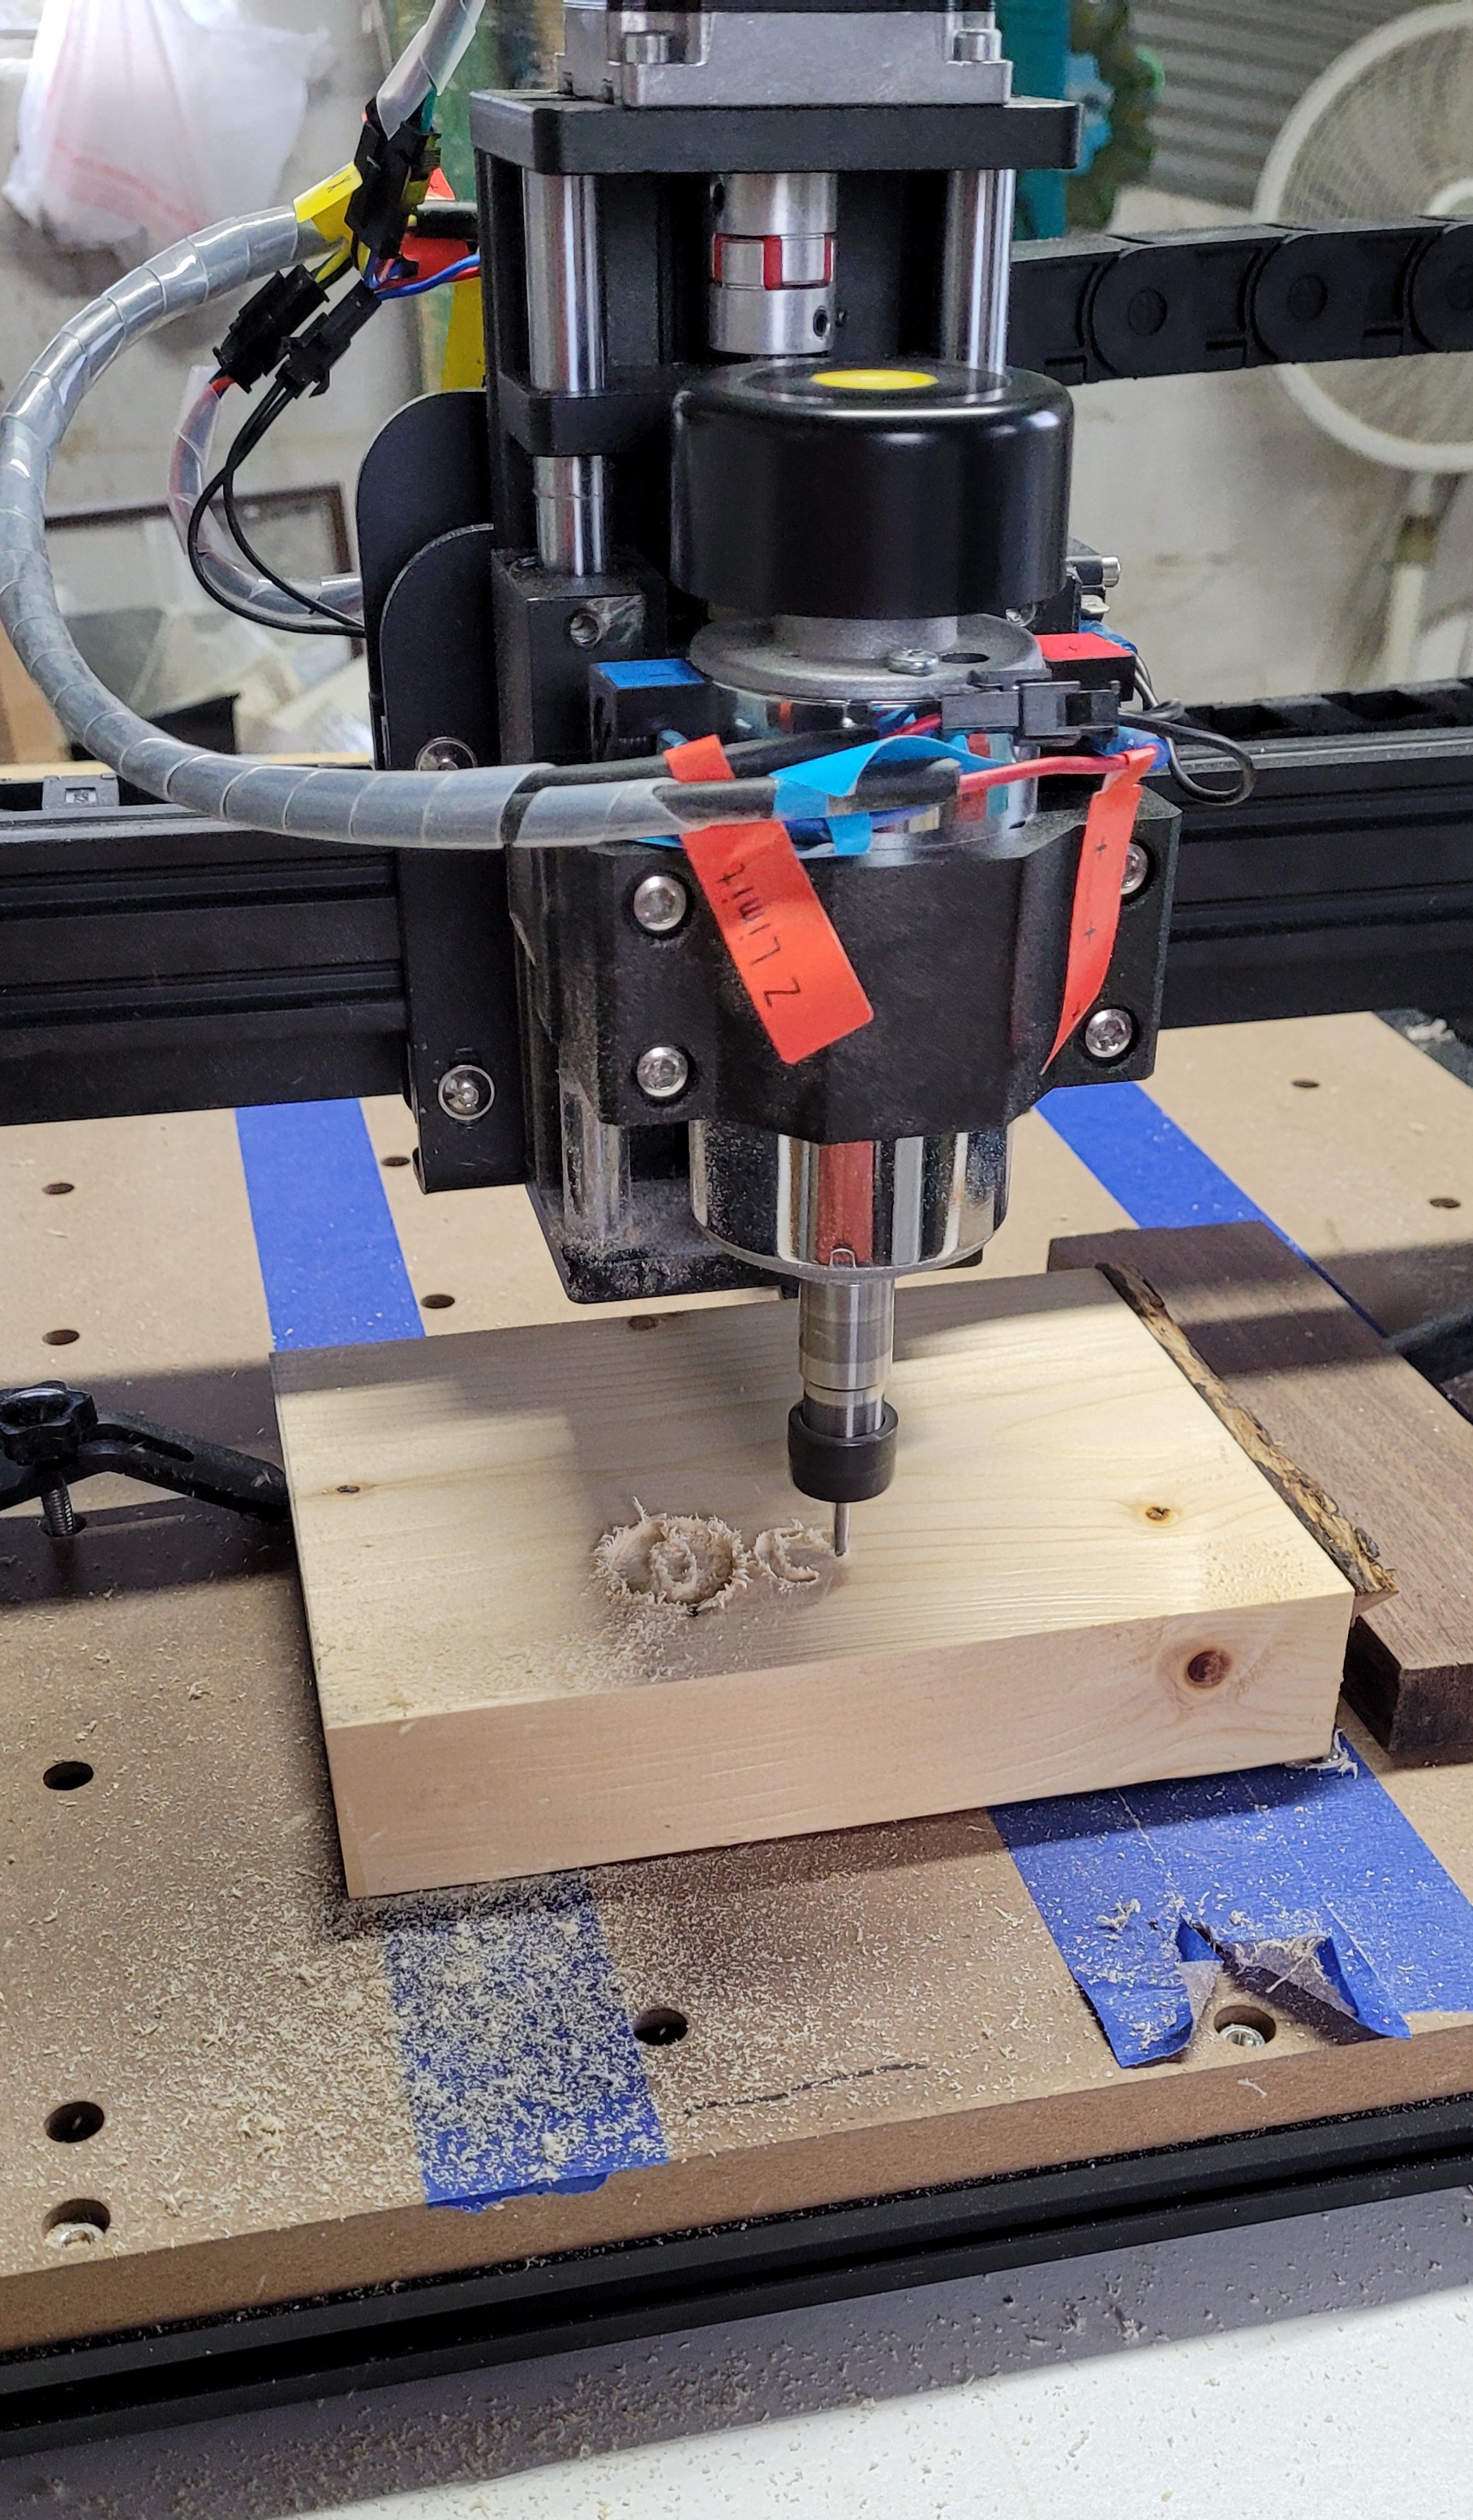
At last I'm almost ready. I'm terrified that I will run the bit and spindle into the clamps, so I've shimmed the workpiece with other pieces on all sides and clamped them. Nothing left to do but hit the go button. "Sheba" is a two-part file, roughing and detail. The bit for detail was already in the spindle and Lord knows what an ordeal it is to take 15 seconds to change the bit, so I decided to run the detail file first. For anyone reading this that's even dumber than me, roughing and detail is done because, obviously a bigger bit can do more faster but can't do the smaller cuts. Hence, the detail file. Pleading mercy from the FoxAlien logo that stared blankly at me from the controller, I poke the send button. The spindle moves into position, hovers momentarily, then lowers itself into the cat profile position. Look! It's doing it! Unguided by human hands, it's moving around, making cuts, sending wood chips into the air. It's mesmerizing. I know I could go do other things in the shop, but it's like magic, watching the images appear right before your eyes. And it's random! For no apparently logical reason, it moves from place to place across the board, a dot here, a line there, all the while singing a tuneless little robotic song to itself. But it is slow. I finally tear myself away from it and move on to other projects, namely, a thorough and complete shop clean-up and re-organization. That's pretty slow-going, too. What to keep, what to repair, what to replace or get rid of, and where to put it in the interim. I checked obsessively on Sheba's progress. Those cuts were deep. I didn't realize how deep two millimeters were in a wood cut. Probably not necessary to cut so deep, and would not take nearly so much time, but a hundred years from now, the words will still be legible. Finally, there is no sound from the other room and I go in to find the machine silent and still, the bit positioned obediently at the starting point of the Sheba piece, ready to move on to the next cut. I change the bit, find the file and tell it to go. Wait, what's it doing? It's not moving but it's drilling a hole. Why are you doing this? I know there were no drill commands in that file. I slap the emergency stop like a game show button and swallow the bile that has arose in my throat. You treacherous machine! I shut down for the night and go in to pick the collective brains of the FoxAlien Facebook group. Bless them, they are so kind and helpful to a dumb beginner, while their posts are full of technical jargon that sounds like a different language. I read them all, in hopes that someday I will learn enough that what they're saying now will someday make some kind of sense.
It was suggested to home the spindle then reset to zero on the workpiece. OK, but I have to get the bit out of the wood. Nothing is moving. I reset, unlock, reset, try again. Ohhhhh, I remember! I have to manually disengage the emergency stop button. The book says so, right after, 'turn the machine on'. Plenty discouraged, I get the spindle as close as I could to the original zero position and hit send. It moves around the board, doing the magic that has lost its luster. I guess there's a way I could have calibrated the machine to the exact starting place if I knew the right numbers and where to put them. But I didn't and there's some slight ghosting. The cat lost a few of its whiskers. However, the piece is salvaged and with the help of some sandpaper and a little Dremel work, it will serve its purpose.
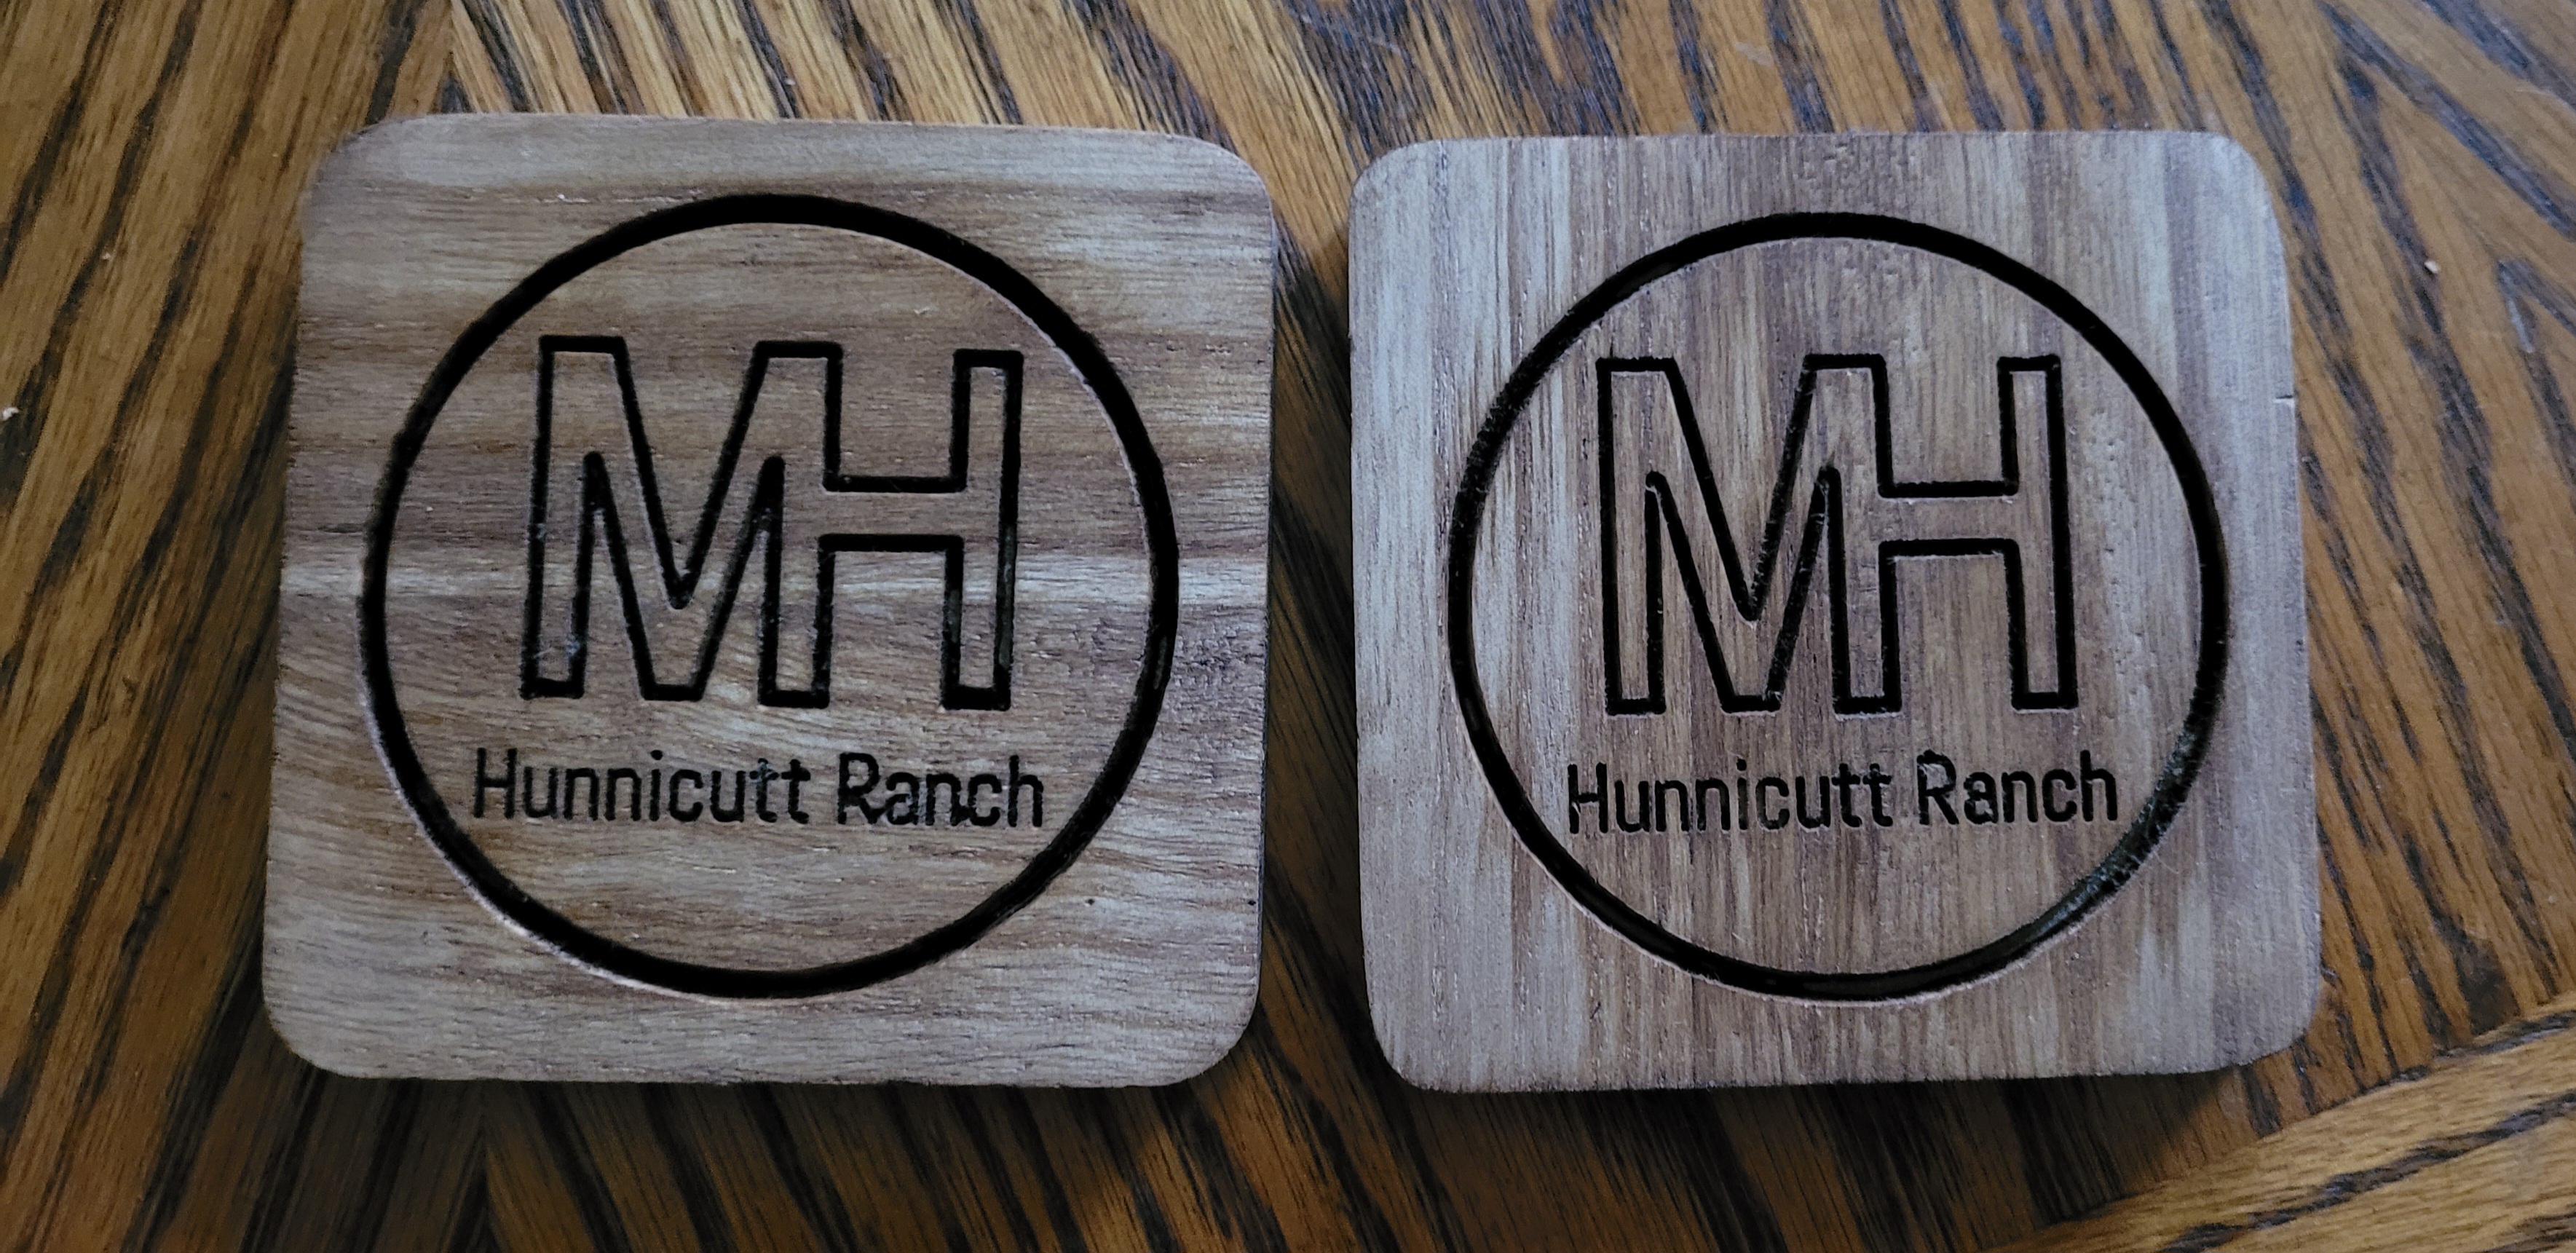
Meanwhile, my niece posted their new ranch logo on Facebook. Super simple, I will make some coasters with this on it and surprise her. I found some nice wooden coasters at Dollar General. After some experimentation with Easel and figuring out that the tiny words below the brand emblem didn't show in preview because the bit was too big, I had a file. I took it to the shop and ran a test piece. Miracle of miracles, it looked pretty good! I shimmed a coaster into place and started the run. It was finished fairly quickly, and the design looked fine, but it was slightly off center. I know how to fix that, I saw PawPaw's Workshop zero to center on a round object, I could do that. What's another cheap coaster? Ummm, no, unless it's written in the g-code, (see what I've learned?), it's going to start from the point the file tells it too. Saw that happening right away so was able to abort without brutalizing the emergency stop button before the spindle had made touchdown. I have temporarily moved on from the coasters. I have some nicer oak pieces I want to do some carves on but have to figure out how to do the exact placement on pre-cut sizes.
My latest project was a small piece I wanted to both engrave and cut out. I had never considered the logistics of doing this, seems like it should be so easy. I worked on a file all afternoon, after much Googling, I found there was an app in Easel that would create an outline around a selected image that could be the cut line, leaving the original lines as engraved lines. I couldn't figure out how to make both lines the same, so my cut line was outside my engraving, but it didn't look too bad. I can live with it. A Bob Ross moment. I've started to get a little more comfortable with my machine, tightening screws, turning knobs and finding out they manually move the axes (axises?), measuring my belt tension. The dust and chips flying into the delicate moving parts make me very nervous, so I hover with the shop vac until the dust shoe I ordered arrives and I can figure out how to install it. It feels like everything I do is a learning process, right down to the WaterPik the dentist recommended a few days ago. If learning keeps you young, I'll never die. Kudos to all you smarties on Facebook who show pics of the dust shoes you personally milled. So I got my 1/4 material taped and clamped very neatly and efficiently. I'm getting the hang of this. Went through the steps, hit send. The sharp little bit moved to a perfectly random starting point, but I could see the beginning of the design. I watched it progress, again I over-estimated the need to cut tiny letters so deep, but it was still looking generally like the image in the preview. Still way off from the placement on the material but I had allowed plenty of room, so it wouldn't matter for this project. Something I definitely have to figure out, though. This is so cool, it was down to the last step, cutting the actual outline all the way through. Seemed to be moving right along, when suddenly, the poor spindle made a tortured belch, jerked a downward gash in that innocent angel's head, and came to a complete stop. Dang! I fiddled around with the limit switch reset for a few minutes until I remembered I could manually raise the spindle with the knob on top. I did, and the entire assembly fell out. I had read about that happening, now I have experienced it. And guess what? There was no Allen wrench provided for the tiny little set screws that hold it on. I'd also read people saying that maybe there should be a different method for attaching the spindle, but maybe this is a safety feature. I think the depth was set wrong and the collet got into the material. If it were not able to come loose, maybe it would have damaged the inner workings of the shaft. I had set the depth deeper than 1/4 inch in Easel, because the preview didn't show the cut all the way through. Stupid move by me. I think I might change things too fast in Easel, I certainly make lots of changes and it seems to refresh very slowly. My poor Internet connection, probably. Maybe I confuse it.
My trial for Easel Pro is coming to an end. I've been watching Carveco tutorials, and this is where I stand in progress this morning. I also bought the laser attachment but that seems even more daunting still. I'll probably continue with the cutter until I feel I have at least some rudimentary skill at it. I've already made some advancements from some of the stuff I wrote earlier. I'm figuring out that different apps for various functions are used somewhat interchangeably by people who already know this stuff. It's still murky, but some of the silt is settling. All I can do is keep paddling.